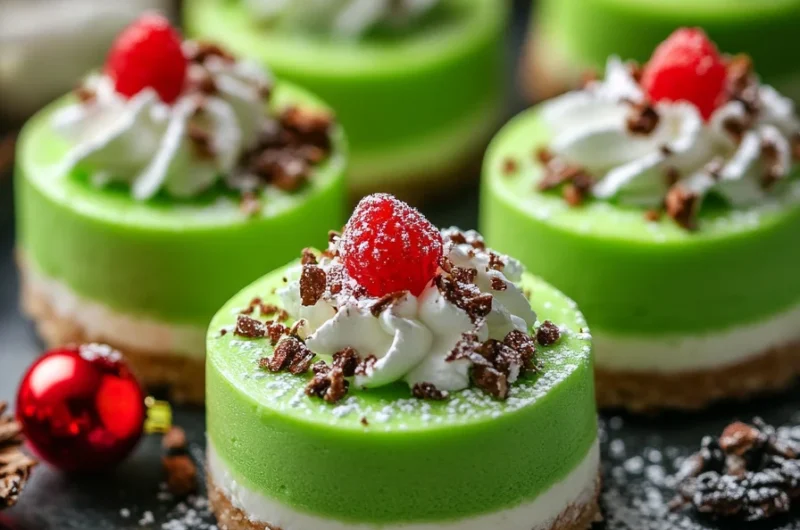
Grinch Mini Cheesecakes are the perfect delightful treat for the holiday season. These bite-sized desserts capture the spirit of the Grinch while offering a wonderful blend of flavors and textures. With their vibrant green hue and festive toppings, these mini cheesecakes are not only delicious but also visually appealing. They embody the holiday cheer and make any gathering festive. Whether you’re hosting a holiday party, looking for a fun dessert to make with kids, or simply craving a sweet treat, Grinch Mini Cheesecakes are a fantastic choice that will leave everyone smiling.
Imagine taking a bite into these adorable mini cheesecakes, filled with creamy richness and a hint of peppermint, reminiscent of the beloved character. Each cheesecake is a delightful reminder of the joy and laughter found in the holiday season. Plus, the bite-sized nature makes them perfect for parties and gatherings where a small treat is just what you need. The cheeriness of these treats makes them a wonderful centerpiece and conversation starter. You’ll be insisting friends and family take one more, making them perfect for holiday sharing.
In this article, you will find everything you need to create these delightful Grinch Mini Cheesecakes, including the reasons you will love this recipe, preparation times, ingredients, and step-by-step instructions. So, let’s get started on making these incredible festive desserts that are bound to be a hit!
Why You’ll Love This Recipe
Grinch Mini Cheesecakes are not just a treat; they’re a celebration of the season, combining whimsical presentation with delightful flavors. Here are some reasons why you’ll fall head over heels for this recipe:
1. Festive Fun: Their vibrant green color brings unmistakable holiday cheer to any occasion.
2. Easy to Make: The process is straightforward, making it suitable for bakers of all skill levels.
3. Shareable Size: Mini desserts are always a hit, allowing guests to indulge without feeling overwhelmed by large portions.
4. Flavorful Twist: The addition of peppermint and chocolate brings a refreshing and nostalgic taste to traditional cheesecake.
5. Versatile Toppings: You have an array of options for garnishing your mini cheesecakes, from whipped cream to candies.
6. Perfect for Any Gathering: These mini cheesecakes are ideal for holiday parties, cookie exchanges, or cozy family gatherings.
These factors contribute to making Grinch Mini Cheesecakes a wonderful addition to your dessert table. Each mini cheesecake encapsulates the spirit of the season while ensuring everyone enjoys a festive treat that’s easy to make!
Preparation and Cooking Time
Preparing Grinch Mini Cheesecakes is both fun and rewarding! Here’s a breakdown of the time you’ll need:
– Preparation Time: 20 minutes
– Chilling Time: 2-3 hours (or overnight if you have the time)
– Total Time: Approximately 2 hours and 20 minutes
These times are approximate and may vary slightly depending on your kitchen setup and efficiency. The chilling time is crucial for the cheesecakes to set perfectly!
Ingredients
– 8 ounces cream cheese, softened
– 1/2 cup granulated sugar
– 1 teaspoon vanilla extract
– 1 teaspoon peppermint extract
– 1 cup whipped cream
– 3-4 drops green food coloring
– 1 cup chocolate cookie crumbs (for crust)
– 1/4 cup unsalted butter, melted
– Red and green sprinkles (for decoration)
– Mini candy canes (for topping, optional)
– Whipped cream (for topping, optional)
Step-by-Step Instructions
Creating Grinch Mini Cheesecakes can be an enjoyable project. Follow these simple steps to bring your festive treats to life:
1. Preheat Oven: Preheat your oven to 325°F (160°C). Line a mini muffin tin with cupcake liners.
2. Make the Crust: In a bowl, combine chocolate cookie crumbs and melted butter until well mixed. Press a tablespoon of this mixture into the bottom of each cupcake liner to form the crust.
3. Prepare the Cheesecake Filling: In a large mixing bowl, beat the softened cream cheese until smooth and creamy.
4. Add Sugar and Extracts: Gradually mix in the granulated sugar, vanilla extract, and peppermint extract until well combined.
5. Color the Mixture: Add drops of green food coloring to the cheesecake mixture until the desired shade of green is achieved. Stir until evenly incorporated.
6. Fold in Whipped Cream: Gently fold the whipped cream into the cheesecake mixture until no streaks remain. This will keep your filling light and airy.
7. Fill the Cups: Carefully spoon the cheesecake mixture over the crust in each cupcake liner, filling them about 3/4 full.
8. Bake: Place the mini muffin tin in the preheated oven and bake for about 15-18 minutes, or until the edges are set. The centers may still be slightly jiggly.
9. Cool: Remove the pan from the oven and let it cool to room temperature. Then, refrigerate for at least 2-3 hours or overnight to allow the cheesecakes to set completely.
10. Decorate: Once set, top each mini cheesecake with a dollop of whipped cream, a sprinkling of red and green sprinkles, and a mini candy cane if desired.
How to Serve
Bringing your Grinch Mini Cheesecakes to the table can be just as fun as making them. Here are some tips for serving these delightful treats:
1. Presentation: Arrange the cheesecakes on a festive platter or dessert stand. This adds an elegant touch to your holiday table.
2. Pairing Suggestions: Serve alongside warm beverages like hot chocolate, coffee, or holiday-inspired cocktails to complement the flavors.
3. Garnishes: For added flair, consider placing a mini candy cane on each cheesecake and adding additional sprinkles for a pop of color.
4. Themed Parties: These mini cheesecakes are perfect for a Grinch-themed party, where you can incorporate other green and red decorations to tie everything together.
5. Encourage Sharing: Place a note next to the dessert indicating that they are shareable! This encourages guests to enjoy and swap desserts, enhancing the festive spirit.
By thoughtfully presenting and serving your Grinch Mini Cheesecakes, you’ll elevate the entire holiday experience for everyone!
Additional Tips
– Use Room Temperature Ingredients: Ensure your cream cheese and whipped cream are at room temperature to achieve a smooth filling.
– Experiment with Flavor: For a twist, try using different extracts like almond or vanilla in place of peppermint.
– Garnish Creatively: Consider adding chocolate shavings or fresh mint leaves to enhance the visual appeal and flavor.
– Serve Chilled: These mini cheesecakes are best enjoyed chilled. Keep them in the refrigerator until serving time.
Recipe Variation
Get creative in the kitchen! Here are some fun variations to try with your Grinch Mini Cheesecakes:
1. Chocolatey Delight: Add a layer of melted chocolate on top of the cheesecake filling before cooling for a richer flavor.
2. Fruit Toppings: Top with fresh berries like strawberries or blueberries for a fruity touch that complements the mint.
3. Alternate Crusts: Use crushed graham crackers or gingerbread cookies instead of chocolate cookie crumbs for a different flavor base.
4. Non-Dairy Option: Substitute cream cheese with a non-dairy alternative for a lactose-free version that everyone can enjoy.
Freezing and Storage
– Short-Term Storage: Keep your Grinch Mini Cheesecakes in an airtight container in the refrigerator, where they will stay fresh for about 4-5 days.
– Freezing: You can freeze the mini cheesecakes for up to 2 months. Place them in an airtight container or wrap each cheesecake individually with plastic wrap to prevent freezer burn. When ready to enjoy, simply thaw them in the refrigerator overnight.
Special Equipment
Prepare for your baking adventure with this essential equipment:
– Mini muffin tin
– Cupcake liners
– Mixing bowls (various sizes)
– Electric mixer or whisk
– Rubber spatula for folding
– Measuring cups and spoons
Frequently Asked Questions
Can I use a regular muffin tin instead of a mini muffin tin?
Yes, you can use a regular muffin tin. Just remember to adjust the baking time, as larger cakes will need longer to cook through.
What is the best way to remove the cheesecakes from the liners?
Let them chill completely. Gently peel back the cupcake liner. If they stick, use a small butter knife to help lift them out.
Can I substitute the whipping cream with a lighter alternative?
Yes, you can use cool whip or a light whipped topping, though the texture may differ slightly.
What can I do if I don’t have peppermint extract?
If peppermint extract is unavailable, you can use mint extract for a different but still refreshing flavor.
How far in advance can I make these cheesecakes?
These mini cheesecakes can be made up to three days in advance. Keep them covered in the refrigerator until you’re ready to serve.
Conclusion
Grinch Mini Cheesecakes are a delightful and festive dessert that captures the spirit of the holiday season. With their vibrant colors and delicious flavor, these mini treats are sure to be a hit at any gathering or party. They are sweet, creamy, and perfectly portioned for sharing. So gather your ingredients and start this fun baking project that will spread joy and deliciousness to everyone around you!
Grinch Mini Cheesecakes: The Ultimate Amazing Recipe

- Prep Time: 15 minutes
- Cook Time: 18 minutes
- Total Time: 33 minutes
Ingredients
– 8 ounces cream cheese, softened
– 1/2 cup granulated sugar
– 1 teaspoon vanilla extract
– 1 teaspoon peppermint extract
– 1 cup whipped cream
– 3-4 drops green food coloring
– 1 cup chocolate cookie crumbs (for crust)
– 1/4 cup unsalted butter, melted
– Red and green sprinkles (for decoration)
– Mini candy canes (for topping, optional)
– Whipped cream (for topping, optional)
Instructions
Creating Grinch Mini Cheesecakes can be an enjoyable project. Follow these simple steps to bring your festive treats to life:
1. Preheat Oven: Preheat your oven to 325°F (160°C). Line a mini muffin tin with cupcake liners.
2. Make the Crust: In a bowl, combine chocolate cookie crumbs and melted butter until well mixed. Press a tablespoon of this mixture into the bottom of each cupcake liner to form the crust.
3. Prepare the Cheesecake Filling: In a large mixing bowl, beat the softened cream cheese until smooth and creamy.
4. Add Sugar and Extracts: Gradually mix in the granulated sugar, vanilla extract, and peppermint extract until well combined.
5. Color the Mixture: Add drops of green food coloring to the cheesecake mixture until the desired shade of green is achieved. Stir until evenly incorporated.
6. Fold in Whipped Cream: Gently fold the whipped cream into the cheesecake mixture until no streaks remain. This will keep your filling light and airy.
7. Fill the Cups: Carefully spoon the cheesecake mixture over the crust in each cupcake liner, filling them about 3/4 full.
8. Bake: Place the mini muffin tin in the preheated oven and bake for about 15-18 minutes, or until the edges are set. The centers may still be slightly jiggly.
9. Cool: Remove the pan from the oven and let it cool to room temperature. Then, refrigerate for at least 2-3 hours or overnight to allow the cheesecakes to set completely.
10. Decorate: Once set, top each mini cheesecake with a dollop of whipped cream, a sprinkling of red and green sprinkles, and a mini candy cane if desired.
Nutrition
- Serving Size: 12 mini cheesecakes
- Calories: 230 kcal
- Fat: 14g
- Protein: 3g