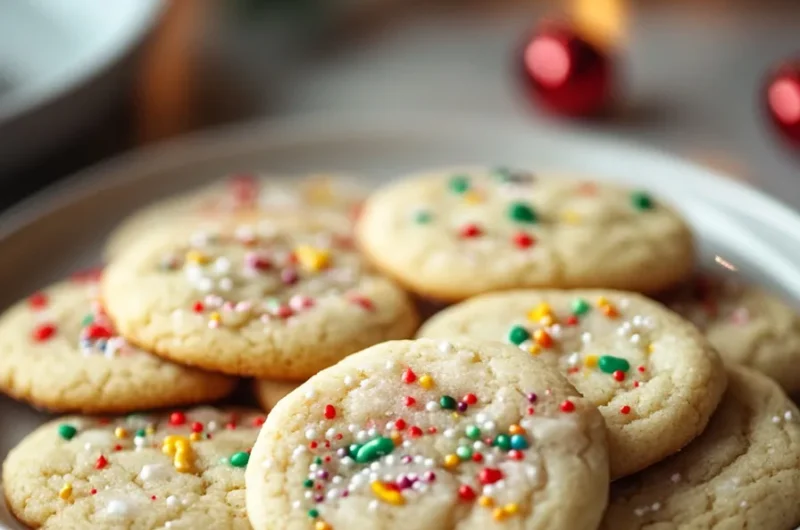
Sugar cookies for decorating are a delightful canvas for your creativity. They are perfect for any occasion, whether it’s a holiday, birthday, or just a fun weekend project. These cookies are not only delicious but also incredibly versatile. You can customize them with various colors, shapes, and designs. With the ultimate recipe presented in this article, you’ll learn how to make these amazing cookies that will impress your friends and family.
If you’ve ever tasted a perfectly decorated sugar cookie, you know how satisfying it is to take a bite out of something that looks as good as it tastes. These cookies have a soft and buttery texture that’s a joy to eat. Plus, they serve as a fun activity for everyone involved. In this guide, you’ll uncover why sugar cookies are so loved, how to prepare them successfully, and the best ways to serve them. Let’s jump into the sweet world of sugar cookies and uncover the secrets to making them beautifully decorated!
Why You’ll Love This Recipe
Sugar cookies for decorating bring happiness and creativity to any baking session. There are numerous reasons to adore this recipe, including:
1. User-friendly Ingredients – Most ingredients are staples found in your kitchen.
2. Endless Creativity – Enjoy personalizing your cookies with different colors and designs.
3. Perfect for Any Event – Ideal for holidays, parties, or just because!
4. Fun for All Ages – Great activity for kids and adults alike; everyone can get involved!
5. Tasty Treats – Deliciously sweet and perfectly chewy, these cookies are a crowd-pleaser.
6. Easy to Follow – Simple steps ensure success even for novice bakers.
These benefits underscore why sugar cookies for decorating are a beloved treat in many households. They are more than just a sweet snack; they create memories, inspire creativity, and invite fun into the kitchen!
Preparation and Cooking Time
When preparing sugar cookies for decorating, it’s essential to know how long this delightful process will take. Here’s a quick breakdown:
– Preparation Time: 20 minutes
– Chilling Time: 1 hour (this is necessary for the dough)
– Cooking Time: 10–12 minutes
– Total Time: Approximately 1 hour and 30 minutes
Taking the time to chill the dough will pay off in the end, resulting in perfectly shaped cookies.
Ingredients
– 2 ¾ cups all-purpose flour
– 1 teaspoon baking powder
– ½ teaspoon salt
– 1 cup unsalted butter, softened
– 1 ½ cups granulated sugar
– 1 large egg
– 2 teaspoons vanilla extract
– 1 teaspoon almond extract (optional)
– Royal icing or fondant for decorating
– Food coloring (optional)
Step-by-Step Instructions
Creating sugar cookies for decorating can be easy and fun if you follow these straightforward steps:
1. Prepare the Dough: In a bowl, combine the flour, baking powder, and salt. Set aside.
2. Cream the Butter and Sugar: In a separate bowl, cream the softened butter and granulated sugar until light and fluffy.
3. Add Egg and Flavorings: Beat in the egg, vanilla extract, and almond extract until combined.
4. Mix Dry Ingredients: Gradually add the flour mixture to the butter mixture. Mix until just combined, being careful not to overwork the dough.
5. Chill the Dough: Divide the dough into two discs, wrap each in plastic wrap, and refrigerate for at least 1 hour.
6. Preheat the Oven: Preheat your oven to 350°F (175°C) while the dough is chilling.
7. Roll Out the Dough: On a lightly floured surface, roll out one disc of dough to about ¼ inch thick.
8. Cut Out Shapes: Use cookie cutters to cut out desired shapes and place them on a baking sheet lined with parchment paper.
9. Bake: Bake for 10–12 minutes or until the edges are lightly golden. Remove from the oven and let them cool on the sheet for a few minutes before transferring to a wire rack.
10. Decorate: Once cooled, use royal icing or fondant to decorate as desired. You can add food coloring to the icing for more vibrant designs.
Following these steps will lead you to beautifully baked and decorated sugar cookies that everyone will love.
How to Serve
When it comes to serving your decorated sugar cookies, presentation matters. Here are some tips on how to serve them beautifully:
1. Display on a Plate: Arrange the cookies on a decorative platter for an enticing presentation.
2. Individual Bags: Consider packaging cookies in clear bags tied with ribbons for parties or gifts.
3. Themed Displays: Match the cookies to your event theme, using colors and decorations that fit the occasion.
4. Accompaniments: Serve with beverages like milk, tea, or coffee for a delightful tasting experience.
5. Create Cookie Sandwiches: Place icing between two cookies to create a fun and delicious cookie sandwich.
By taking the time to present your sugar cookies thoughtfully, you enhance the overall experience for yourself and your guests, making them memorable treats.
Additional Tips
– Use High-Quality Butter: Opt for unsalted, high-fat butter for the best flavor and texture in your sugar cookies.
– Experiment with Flavors: Try incorporating different extracts, such as lemon or maple, to create unique flavor profiles.
– Chilling the Dough: Don’t skip the chilling step, as it helps the cookies maintain their shape and texture during baking.
– Use Piping Bags: For intricate designs, using a piping bag can give you precision when decorating with icing.
– Practice Patience: Allow your decorated cookies to dry completely before stacking or packaging them to avoid smudging.
Recipe Variation
Try mixing things up with these fun variations:
1. Sprinkle Sugar: Before baking, sprinkle colored sugar on top of the cookies for an added crunch and sparkle.
2. Chocolate-Dipped Cookies: Dip half of the cooled cookies in melted chocolate and let them set for a delicious variation.
3. Citrus Zest: Add the zest of a lemon or lime to the dough for a refreshing twist that pairs beautifully with icing.
Freezing and Storage
– Storage: Store decorated cookies in an airtight container at room temperature for up to 1 week.
– Freezing: Freeze unbaked cookie dough in disc shape for up to 3 months. When ready to bake, simply thaw and cut out shapes as desired.
– Icing: If you plan to freeze, consider waiting to decorate the cookies until after they have thawed. This will keep your decorations fresh.
Special Equipment
To create stunning sugar cookies for decorating, you will need:
– Rolling Pin: For rolling out your dough evenly.
– Cookie Cutters: A variety of shapes and sizes for all occasions.
– Parchment Paper: For lining your baking sheets and preventing sticking.
– Mixing Bowls: Multiple sizes for preparing cookie dough and icing.
– Baking Sheets: Ensure you have enough to bake multiple trays at once.
Frequently Asked Questions
Can I use gluten-free flour for this recipe?
Yes, you can substitute all-purpose flour with a gluten-free blend. Just ensure it has xantham gum in the mix.
What can I use if I don’t have royal icing?
You can use simple icing made with powdered sugar, milk, and vanilla extract as an alternative for decorating.
How long can I store undecorated cookies?
Undecorated sugar cookies can be stored in an airtight container for up to 2 weeks at room temperature.
Can I bake the cookies in advance?
Absolutely! You can make the cookies days in advance and decorate them closer to the event for optimal freshness.
What should I do if my dough is too soft?
If your dough is overly soft, you can add a little more flour, or chill it for an additional 30 minutes to firm it up.
Conclusion
Creating beautiful sugar cookies for decorating is a satisfying experience that combines baking with artistry. Whether you celebrate holidays, birthdays, or simply want to enjoy a DIY project, these cookies can cater to all your creative needs. With the right recipe and a sprinkle of imagination, you’ll bake cookies that not only taste heavenly but also look stunning. Remember, baking sugar cookies is a journey filled with fun, flavor, and opportunities to express yourself. Enjoy every moment in the kitchen, and let your cookie creations shine!
Sugar Cookies for Decorating: An Amazing Ultimate Recipe

- Prep Time: 15 minutes
- Cook Time: 10-12 minutes
- Total Time: 2 minute
Ingredients
– 2 ¾ cups all-purpose flour
– 1 teaspoon baking powder
– ½ teaspoon salt
– 1 cup unsalted butter, softened
– 1 ½ cups granulated sugar
– 1 large egg
– 2 teaspoons vanilla extract
– 1 teaspoon almond extract (optional)
– Royal icing or fondant for decorating
– Food coloring (optional)
Instructions
Creating sugar cookies for decorating can be easy and fun if you follow these straightforward steps:
1. Prepare the Dough: In a bowl, combine the flour, baking powder, and salt. Set aside.
2. Cream the Butter and Sugar: In a separate bowl, cream the softened butter and granulated sugar until light and fluffy.
3. Add Egg and Flavorings: Beat in the egg, vanilla extract, and almond extract until combined.
4. Mix Dry Ingredients: Gradually add the flour mixture to the butter mixture. Mix until just combined, being careful not to overwork the dough.
5. Chill the Dough: Divide the dough into two discs, wrap each in plastic wrap, and refrigerate for at least 1 hour.
6. Preheat the Oven: Preheat your oven to 350°F (175°C) while the dough is chilling.
7. Roll Out the Dough: On a lightly floured surface, roll out one disc of dough to about ¼ inch thick.
8. Cut Out Shapes: Use cookie cutters to cut out desired shapes and place them on a baking sheet lined with parchment paper.
9. Bake: Bake for 10–12 minutes or until the edges are lightly golden. Remove from the oven and let them cool on the sheet for a few minutes before transferring to a wire rack.
10. Decorate: Once cooled, use royal icing or fondant to decorate as desired. You can add food coloring to the icing for more vibrant designs.
Following these steps will lead you to beautifully baked and decorated sugar cookies that everyone will love.
Nutrition
- Serving Size: 24 cookies
- Calories: 150 kcal
- Fat: 6g
- Protein: 2g